
Table of Contents
Hands are among the most expressive parts of the human body. They can convey tension, tenderness, power, or vulnerability—all without a single word. To draw an expressive hand is to tap into a visual language that transcends anatomy and enters the realm of emotion. In this post, we’ll explore how to capture dynamic gestures, understand the underlying structure, and use line, form, and rhythm to bring your hand drawings to life.

credit: jasonpogo
Hands are storytellers. A clenched fist can suggest anger or determination. An open palm might express surrender, generosity, or calm. When you learn to draw hands expressively, you unlock a powerful tool for visual storytelling—whether you’re working in comics, fine art, illustration, or animation.
Drawing expressive hands also sharpens your understanding of gesture, anatomy, and proportion. It challenges you to balance structure with spontaneity, and realism with emotion.
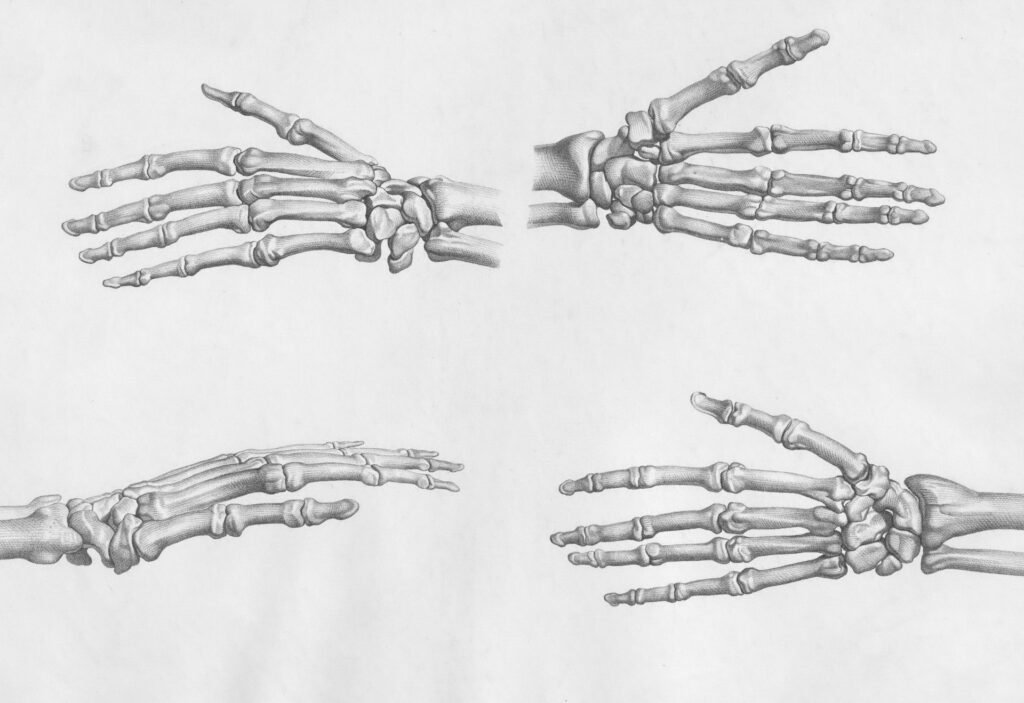
Understanding the Anatomy of the Hand
Why Structure Matters in Artistic Gesture
Before you can stylize or exaggerate hand poses, it’s essential to understand their underlying anatomy. Knowing how the hand is built allows you to bend the rules without breaking believability. Whether you’re sketching subtle gestures or dynamic action, anatomical awareness gives your drawings weight, clarity, and emotional resonance.
Key Structural Elements
Palm: The Foundation of Form
The palm acts as a flexible base that supports the fingers and thumb. Visually, it resembles a slightly cupped rectangle, capable of flattening or curling depending on the gesture. Understanding its proportions and how it shifts in perspective is crucial for anchoring your hand drawings.
- The palm contains key pads and muscle groups that affect surface shape
- It folds and creases in predictable ways when gripping or flexing
- Pay attention to the heel of the hand and the base of the thumb for added realism
Fingers: Articulated and Expressive
Each finger has three joints—the metacarpophalangeal (MCP), proximal interphalangeal (PIP), and distal interphalangeal (DIP)—allowing for a wide range of motion. Fingers taper toward the tips and naturally curve, even when relaxed.
- Fingers rarely move in isolation; they tend to follow each other in arcs
- Observe how fingers fan out or cluster depending on emotion or action
- Varying finger lengths and angles adds character to your sketches
Thumb: The Game-Changer
The thumb is opposable and highly mobile, making it essential for grip, balance, and expression. It has only two joints but rotates and pivots in complex ways.
- The thumb’s base (thenar eminence) is muscular and prominent
- It often points in a different direction than the fingers, adding dynamic tension
- Use thumb placement to convey attitude—tucked, extended, or pressing
Knuckles: Gesture Anchors
Knuckles are bony landmarks that help define gesture and tension. They’re most visible when the hand is clenched or flexed.
- The knuckles of the fingers align in a gentle arc—not a straight line
- They shift position depending on the hand’s orientation
- Highlighting knuckles adds structure and emotional weight to poses
Tendons and Veins: Surface Details with Impact
Tendons and veins become more visible in expressive or strained poses. They add realism and energy, especially in high-contrast or stylized drawings.
- Tendons run along the back of the hand and fingers, often visible during extension
- Veins can be subtly indicated to suggest age, emotion, or tension
- Use these details sparingly to enhance drama without cluttering the form

How to Draw an Expressive Hand
Capturing Emotion Through Form
Hands are incredibly expressive—they can convey tension, grace, exhaustion, or joy with a single gesture. To draw them effectively, start with movement and build structure gradually. This step-by-step approach helps you balance anatomy with emotion, creating sketches that feel alive and intentional.
 Sketchbooks.org | RESEARCH HUB:
Expressive Hand Drawings From the Masters
Visual research is critical for any creative endeavor. We have compiled specialized links to lead you directly to images, videos, and inspiration for "Expressive Hand Drawings From the Masters" across the web's best visual search platforms.
Start with the Gesture
Find the Flow First
Begin with a loose, flowing line that captures the overall movement of the hand. This gesture line is the emotional core of the pose—it defines the energy, direction, and rhythm.
- Use sweeping curves or angular strokes depending on the mood
- Don’t worry about anatomy yet—focus on motion
- Think of the hand as a dancer or actor: what is it expressing?
Gesture drawing sets the tone for everything that follows.
Block in the Basic Shapes
Build the Foundation with Simple Forms
Once the gesture is in place, block in the hand using basic shapes:
- Palm: A box or slightly cupped rectangle
- Fingers: Cylinders or tapered tubes
- Thumb: A wedge or triangle shape
This stage is about proportion and placement—not detail. Keep it loose and adjustable.
- Check angles and spacing between fingers
- Use light lines to explore variations
- Think in 3D—how do these shapes occupy space?
Define the Pose
Refine Angles and Overlaps
Now refine the angles of the fingers and thumb. Observe how they:
- Fan out or cluster together
- Curl, extend, or press against surfaces
- Overlap to create depth and foreshortening
Use overlapping shapes to suggest which parts are closer to the viewer. This adds dimension and realism.
- Pay attention to finger joints and natural curves
- Adjust the thumb’s rotation for expressiveness
- Use reference photos or your own hand for accuracy
Add Structure and Tension
Bring Anatomy into Play
Add structural details that give the hand weight and realism:
- Knuckles: Indicate bony landmarks and gesture anchors
- Tendons: Suggest tension, especially on the back of the hand
- Creases: Show folds at joints and areas of movement
These elements help convey emotion—whether the hand is relaxed, clenched, or reaching.
- Emphasize tension with sharp angles and tight curves
- Suggest softness with gentle transitions and rounded forms
- Use line variation to highlight areas of stress or calm
Refine with Line and Value
Finish with Expressive Touches
Use line weight and shading to bring your sketch to life:
- Thicker lines for areas of pressure or shadow
- Lighter lines for soft transitions and highlights
- Shading to define form, light direction, and mood
Keep your strokes expressive—don’t over-polish. Let the energy of the gesture remain visible.
- Use hatching or washes for tonal depth
- Leave some areas loose to preserve spontaneity
- Highlight key features without rendering every detail
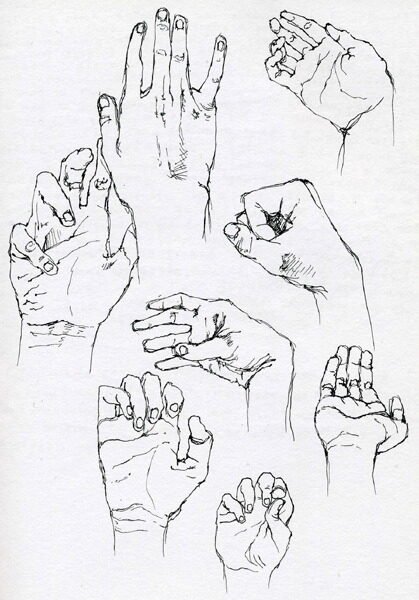
Dynamic Gestures to Practice
Expressive Hand Poses That Build Skill and Emotion
Practicing dynamic hand gestures helps you capture movement, tension, and character in your sketches. These poses challenge your understanding of anatomy and gesture while offering rich opportunities for emotional storytelling.
Pointing
Focus on the extended finger and emphasize tension in the knuckles. Use sharp angles and firm lines to convey direction and intent. This gesture often communicates urgency, accusation, or focus.
Clenching
Show compression in the palm and overlapping fingers. Use tight curves and foreshortening to suggest force and emotion—whether it’s anger, determination, or pain.
Grasping
Use curved lines and overlapping forms to depict depth and grip. Grasping gestures are great for storytelling—holding objects, reaching for support, or expressing desperation.
Reaching
Stretch the fingers and exaggerate the arc of the hand. This gesture conveys longing, effort, or connection. Use elongated shapes and tension in the wrist to heighten drama.
Relaxed
Let the fingers fall naturally with slight bends and spacing. This pose suggests calm, openness, or fatigue. Use soft curves and subtle variation in finger angles to keep it believable.
Tips for Capturing Emotion Through Hands
Techniques to Amplify Expressiveness
Hands are second only to faces in conveying emotion. These tips help you push your hand drawings beyond anatomy into storytelling.
Exaggerate the Gesture
Push the pose slightly beyond realism to heighten emotion. Stretch fingers, bend joints, and tilt angles to emphasize mood. Stylization adds clarity and impact.
Use Reference
Photograph your own hand in different poses or study stills from films, animation, or theater. Real-world reference helps you understand nuance and variation.
Focus on Silhouette
A clear, readable shape communicates more than intricate detail. Squint at your sketch to check if the gesture reads from a distance. Strong silhouettes make gestures instantly recognizable.
Draw in Series
Sketch multiple variations of the same gesture to explore subtle shifts in emotion. Try different angles, finger positions, and wrist movements. This builds fluency and deepens your understanding.
Combine with Facial Expression
Hands and faces together amplify emotional impact. A clenched fist paired with a furrowed brow tells a different story than the same hand with a soft gaze. Use both to create layered, compelling characters.

Sketchbooks.org | INSPIRATION & SUBJECTS
Google Arts & Culture | Amazing Online Resource
Explore a digital universe of inspiration. Discover how this massive online archive brings the world’s greatest museums and artworks directly to your screen.
Frequently Asked Questions
What does it mean to draw an expressive hand?
It means capturing emotion and movement through gesture, anatomy, and line rather than just static form.
How do I make hand drawings more dynamic?
Start with a strong gesture line, exaggerate the pose slightly, and emphasize tension or flow.
Do I need to study anatomy to draw expressive hands?
Yes, a basic understanding of structure helps you exaggerate believably and avoid stiffness.
What’s the hardest part of drawing hands?
Balancing proportion and gesture—especially when fingers overlap or foreshorten.
Can I use my own hand as a reference?
Absolutely—your own hand is one of the best and most accessible references.
How do I show emotion in a hand drawing?
Focus on the pose, silhouette, and line quality to convey mood and intention.
Should I draw hands from imagination or reference?
Both—use reference to build accuracy, then draw from imagination to develop fluency.
Final Thoughts
To draw an expressive hand is to give your artwork a voice. Hands can whisper, shout, plead, or celebrate—all through shape and motion. By studying anatomy, practicing dynamic gestures, and embracing imperfection, you’ll learn to create hands that feel alive and emotionally resonant.
So grab your sketchbook, flex your fingers, and start drawing. The story is already in your hands.

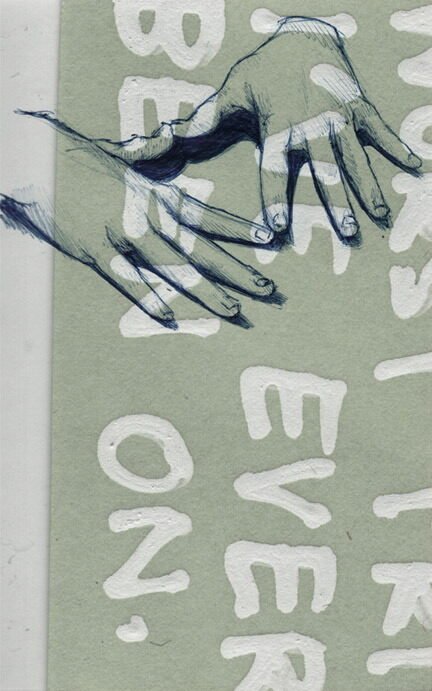
credit: okirun
Ready to Share Your Work?
What kind of subjects most frequently fill your sketchbook pages?

Wow, this unlocked a memory from art camp in middle school—nostalgia and inspiration in one post.
Even if I don’t finish perfectly, the ideas get moving again.
Why are hands always so hard?!